 ПОЗНАВАТЕЛЬНОЕ Сила воли ведет к действию, а позитивные действия формируют позитивное отношение
Как определить диапазон голоса - ваш вокал
Игровые автоматы с быстрым выводом
Как цель узнает о ваших желаниях прежде, чем вы начнете действовать. Как компании прогнозируют привычки и манипулируют ими
Целительная привычка
Как самому избавиться от обидчивости
Противоречивые взгляды на качества, присущие мужчинам
Тренинг уверенности в себе
Вкуснейший "Салат из свеклы с чесноком"
Натюрморт и его изобразительные возможности
Применение, как принимать мумие? Мумие для волос, лица, при переломах, при кровотечении и т.д.
Как научиться брать на себя ответственность
Зачем нужны границы в отношениях с детьми?
Световозвращающие элементы на детской одежде
Как победить свой возраст? Восемь уникальных способов, которые помогут достичь долголетия
Как слышать голос Бога
Классификация ожирения по ИМТ (ВОЗ)
Глава 3. Завет мужчины с женщиной
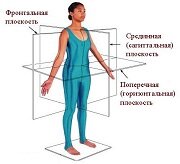
Оси и плоскости тела человека - Тело человека состоит из определенных топографических частей и участков, в которых расположены органы, мышцы, сосуды, нервы и т.д.
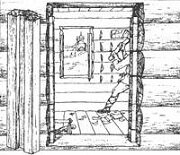 Отёска стен и прирубка косяков - Когда на доме не достаёт окон и дверей, красивое высокое крыльцо ещё только в воображении, приходится подниматься с улицы в дом по трапу. Отёска стен и прирубка косяков - Когда на доме не достаёт окон и дверей, красивое высокое крыльцо ещё только в воображении, приходится подниматься с улицы в дом по трапу.
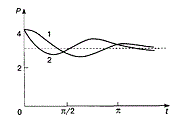 Дифференциальные уравнения второго порядка (модель рынка с прогнозируемыми ценами) - В простых моделях рынка спрос и предложение обычно полагают зависящими только от текущей цены на товар. Дифференциальные уравнения второго порядка (модель рынка с прогнозируемыми ценами) - В простых моделях рынка спрос и предложение обычно полагают зависящими только от текущей цены на товар.
| Установка карбюраторов на мотоцикл
Дважды проверьте, что сливные болты поплавковых камер закручены. Подсоедините топливную магистраль, тросы подсоса и тросы газа. Установите карбюраторы в приемные отверстия двигателя. Они должны устанавливаться с легким нажатием, проверьте, что им не мешает что-нибудь вроде трубок, кабелей, фиксаторов. Затяните хомуты фиксирующие карбюраторы на впускных отверстиях. Установите на место воздушный фильтр и топливный бак. Не забудьте подсоединить и открыть бак. Лучше если в нем будет много бензина. Прежде чем двигатель заработает, необходимо чтобы в пустые поплавковые камеры дошел бензин. Для этого можно или долго крутить двигатель стартером, или подключить бензонасос минуя реле, как описано на странице 18-9 мануала. Насос заработает как только вы включите зажигание и остановится когда поплавковые камеры наполнятся бензином. После этого нужно выключить зажигание и подсоединить бензонасос штатным способом. После того как мотоцикл завелся, необходимо произвести точную синхронизацию. Настройка карбюратора: http://homepage.eircom.net/~hondabros/CARB_OVERHAUL.html Форум по карбюратору: http://www.honda-bros.ru/forum/lofiversion/index.php/t226.html Про PGM: http://www.honda-bros.ru/forum/lofiversion/index.php/t656.html
CARB OVERHAUL 
Purpose of each component. - The float and it's valve regulates the amount of fuel in the chamber.
- The vacuum piston moves in and out to change the effective throttle bore diameter
so as to maintain the constant velocity of the column of air passing thru the carb. - The jet needle, needle jet and jets supply and atomize the fuel before it mixes
with the column of air. - The pilot screw controls the mixture proportions of the fuel and air.
- The choke cable valve and the air cut off valve enrich the fuel air mix when
the choke lever is pressed to aid easier starting. - Both carbs have to be synchronized to ensure that each carb is suppling an
equal amount of fuel/air to each cylinder at idle speed. General info. - Unleaded petrol.
- Fuel tank holds 12 litres which includes a 2 litre reserve.
- The motorcycle has two constant velocity (CV) carburettors.
- Idle speed should be 1,200 ± 100 rpm.
- Throttle free play should be 2-6 mm.
- Vaccum difference between intake manifolds should not exceed 40 mmHg.
- The fuel pump can pump up to 600 cc/min, 10V.
- To initially set the pilot screw: Screw the pilot screw all the way in,
but do not tighten it as this will damage the seat,
Then screw out the specified number of turns,
Then fine tune. The fuel tap has 3 positions. 1. "RES" means the carbs get access to all petrol in the tank including reserve. 2. "OFF" means that no petrol gets thru the tap, switch off tap before
diconnecting hose. 3. "ON" means the carbs get access to the first 10 liters in the tank but
not the last two liters. Carb removal - Remove fuel tank and air box.
- Disconnect throttle cables.
- Pull back the rubber boots over the choke cables and screw out choke cable
fasteners from the carb (10mm open spanner). - Disconnect the fuel line and plug it.
- Loosen the screws on the top of the insulators (AKA inlet rubbers, carb holders).
- Lever out the carbs, the carbs might be difficult to remove.
- It may be wise to remove the inlet rubbers and inspect them for cracking which
is usually on the engine side, also the rubbers should be soft and flexible. - Drain fuel from the hoses and then open the bleed screws on the float chamber
covers to drain away the fuel. Disassembly - If you intend to clean the outside of the carbs, seal off all the holes with
tape and apply engine degreaser, agitate with a brush and rinse off, then thoroughly
dry with a clean cloth and compressed air. - You do not have to separate the two carbs but it's easy so I'd do it any way.
- Remove float chamber cover, float pin, float, float valve, float valve seat,
filter behind seat, main jet, needle jet and slow jet. - Remove air cut off valve cover, spring, diaphragm and O-ring.
- The piston and it's diaphragm cost Ђ120.
- Remove vacuum piston cover, note: the cover is under spring load so hold it down
with one finger until you have removed all it's screws, the spring might pinch the
rubber diaphragm so put your finger inside the throttle bore and push up the piston,
then gently lift up the cover. - Gently and with caution lift out the piston/diaphragm.
- If you consider it necessary to remove the pilot screw then screw the pilot
screw in until it seats and count the exact number of turns it took, then
record this number, then remove the screw with it's O-ring, seat(washer) and
spring.
Note: Do not tighten the pilot screw or you will damage it's seat. - Liberally spray every nuck, cranny and orifice of the carb internals with a
quality carb cleaner, then blow out all the holes with compressed air. Inspection - Check the outer ring of the vacuum piston's diaphragm for cracks and hold it
up to a light to see if it has any holes in it. - Check the side of the piston for excessive wear or scoring.
- Check the air cut off valve's diaphragm for damage.
- Check that the float chamber gasket is soft and pliable and free from cracks.
- Check the rubber tip of the float valve for wear or damage, check the operation
of the float valve and seat. - Check the jets for clogging, apply carb cleaner and blow thru with compressed
air. - Ensure that no air-way is clogged.
- Check pilot screws O-ring.
- Remove the jet needle from the piston using a screw driver to press down
the holder and turning it 90°. Assembly.
- You can buy a complete carb repair kit from wemoto.com for one carb for Ј20.
It contains all O-rings except air cut off valve O-ring and elbow joint O-ring.
It also contains all jets, jet needle and float chamber gasket, it does not contain
a diaphragm. - It is important to ensure that the carb internals have been cleaned thoroughly
and that there are no blockages or clogging. - Apply anti-seize to all external screws before installing.
- Re-install the jet needle in the vacuum piston by pushing it's holder over the
needle and turning it 90°. - Install the piton/diaphragm positioning the tab over the hole, install spring,
lift up the piston before installing the cover to ensure you don't pinch the
diaphragm with the spring, position the corner of the cover with the channel
over the diaphragm tab. Tighten down all screws securely. - The float has a metal tang on it for holding the float valve.
- Float chamber: Install needle jet, main jet, slow jet, float valve seat
with it's sealing washer and float valve with float and float pin, double check
that you have screwed in everything until it has seated. - Float level: Measure the float level by rotating the carb body so that
the float tang just contacts the float valve, you can use special float level
tool or you could use the dept gauge of a vernier caliper. Adjust the float
level by carefully bending the tang.
Note: See the table below for float level.
 - Install the float chamber cover with it's new gasket.
- Install the air cut off valve parts.
- Install pilot screw, screw it in until it seats lightly and then screw it out
the recorded number of turns. - If you wish to re-tune the carbs the initial setting for the pilot screw is:
 | Model | Float Level (mm) | Pilot Screw (No. of turns out) | | 400J | | 2-1/2 | | 650J | 9.2 | 2-1/2 | | 400K | | 2-1/4 | | 650K | 9.2 | 2-7/8 | | 400L | | 2-5/8 | | 650L | 9.2 | 2-3/4 | - Check that the throttle turns freely.
- Turn the throttle stop screw to align the rear cylinder carb throttle valve
with the by-pass holes. Now turn the synchronization screw until the front
cylinder carb throttle valve aligns with the by-pass hole, (approx synchronization). Carb installation. - install carb, a little rubber grease might help, don't over tighten bands.
- Connect fuel hose.
- Re-attach chock cables, check that choke cable works.
- Re-attach throttle cables, throttle free play should be 2-6mm.
- Install Air box, filter and cover.
- Install fuel tank, reconnect fuel hose and turn on fuel tap.
Pilot screw adjustment (only if you wish to re-tune)
Idle drop procedure (USA only). Note: - The pilot screws are factory pre-set and no adjustment is
necessary unless the pilot screws are replaced. - Use a tachometer with graduations of 50 rpm or smaller
that will accurately indicate a 50 rpm change.
1. Turn each piolt screw clockwise until it seats lightly and
back it out to the specification in the table above.
This is an initial setting prior to the final pilot screw adjustment.
Caution
Damage to the pilot screw seat will occur if the pilot screw is
tightened against the seat. 2. Warm up the engine to operating temperature.
Stop and go riding for 10 minutes is sufficient. 3. Attach a tachometer according to the manufacturer's
instructions. 4. Adjust the idle speed with the throttle stop screw. 5. Turn each pilot screw 1/2 turn out from the initial setting. 6. If the engine speed increases by 50 rpm or more, turn
each pilot out by an additional 1/2 turn until engine
speed drops by 50 rpm or less. 7. Adjust the idle speed with the throttle stop screw. 8. Turn the rear cylinder carburetor pilot screw in until the
engine speed drops by 50 rpm. 9. Turn the rear cylinder carburetor pilot screw 1 turn out
from the position obtained in step 8. 10. Adjust the idle speed with the throttle stop screw. 11. Perform, steps 8, 9 and 10 for the front cylinder carburetor
pilot screw.
|